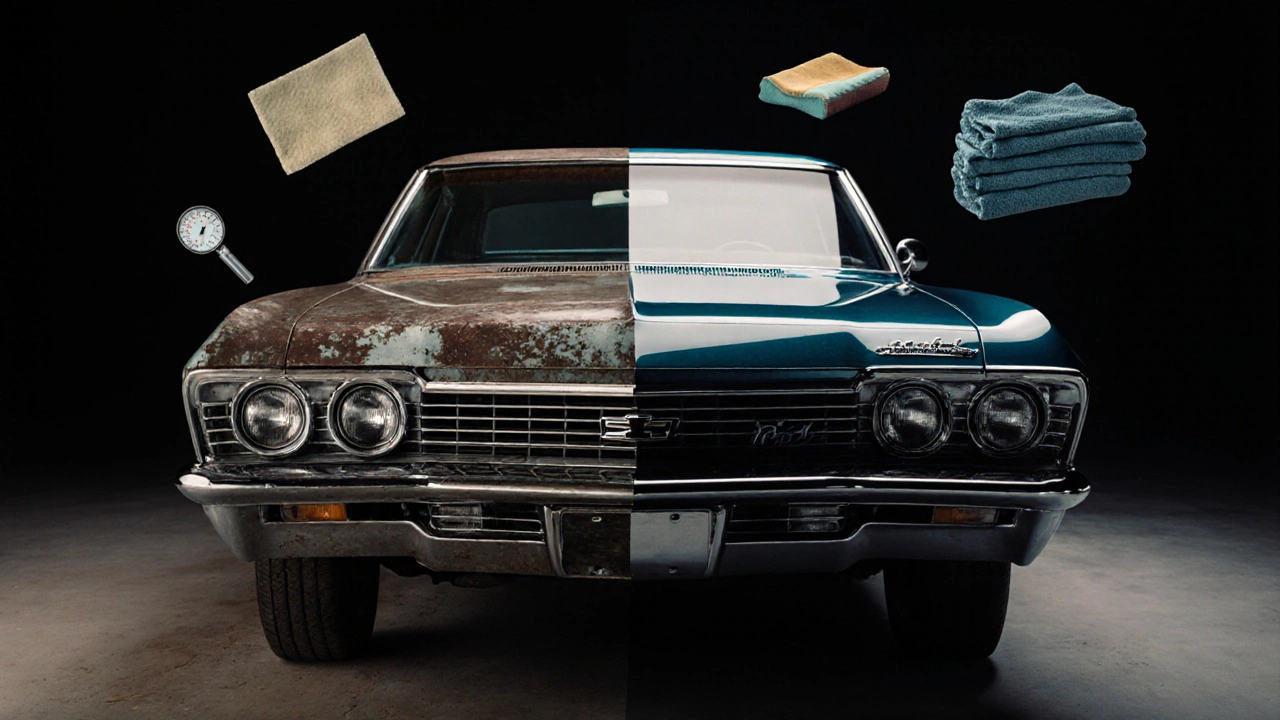
Nothing kills the value of a classic car faster than dull, hazy, or scratched paint. You’ve spent months restoring the engine, reupholstering the seats, and polishing the chrome. But when you step back and look at the body, the paint looks like it’s been through a sandstorm. That’s not just cosmetic-it’s a red flag for collectors and buyers. The good news? Paint correction isn’t magic. It’s a repeatable process: compounding, polishing, and protection. Do it right, and your 1967 Mustang or 1972 Jaguar E-Type will look like it rolled off the factory line yesterday.
Why Classic Car Paint Is Different
Most modern cars use clearcoat paint, a hard, protective layer that sits on top of the color. It’s tough, repairable, and designed to last. Classic cars? They don’t have that. Most were painted with single-stage enamel or lacquer. These paints are softer, more porous, and prone to oxidation. Over time, UV exposure, acid rain, and even bird droppings eat into the surface. What looks like dirt? It’s actually the paint breaking down.That’s why you can’t just throw on a quick wax and call it a day. Modern detailing products often fail on classic paint. They’re too aggressive or too oily. You need a system built for older finishes.
Step One: Compounding
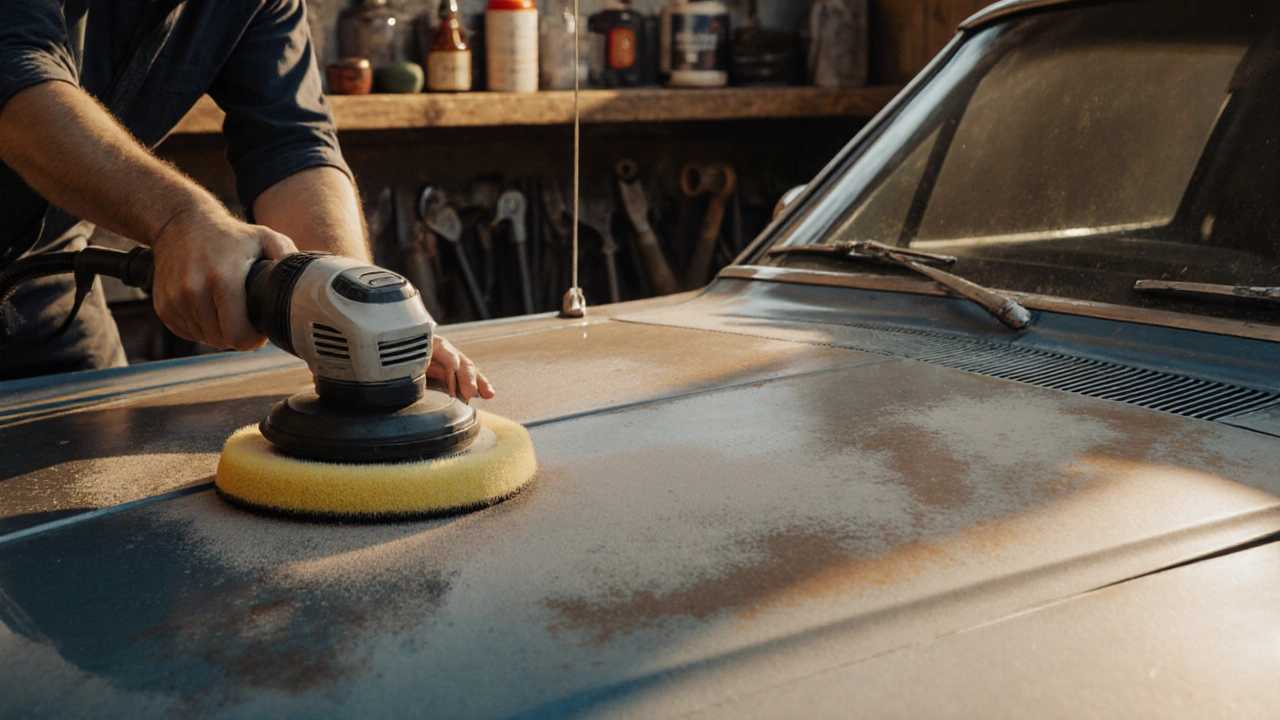
Compounding is the heavy lifting. It removes deep scratches, swirls, and oxidation. Think of it like sanding wood before staining-only you’re using abrasive compounds and a machine polisher.Start with a cutting compound designed for classic paint. Products like Meguiar’s M105 or Menzerna Power Finish work well because they’re less oily and more controllable than modern heavy-cut compounds. Use a foam cutting pad-don’t use wool unless you’re an expert. Wool can dig into the paint and create new scratches.
Set your dual-action polisher to 4 or 5 on the speed dial. Work in 2x2 foot sections. Don’t rush. Apply the compound in a crosshatch pattern: left to right, then up and down. Let the machine do the work. Don’t press down. You’ll know you’re doing it right when the paint starts to look cloudy. That’s the compound lifting the defects out.
After compounding, wipe the panel clean with a microfiber towel. You’ll see the difference immediately. The paint loses its hazy look. But it won’t be glossy yet. That’s normal. Compounding removes material. Polishing brings back the shine.
Step Two: Polishing
Polishing is where the magic happens. It smooths out the fine scratches left by compounding and creates a mirror-like finish. This step is non-negotiable. Skip it, and your car will look like it’s been buffed with sandpaper.Use a finer polish-something like Meguiar’s M205 or Menzerna PO85RD. Pair it with a soft polishing pad. Again, work in small sections. Use the same crosshatch technique. You’ll notice the surface starts to glow. That’s the light reflecting off a perfectly flat surface.
Classic paint is thin. You might only have 2-3 microns of paint left on some panels. That’s thinner than a human hair. So be gentle. Check your progress every few passes. If you’re seeing clear spots where the color is fading, stop. You’re too close to the edge.
Pro tip: Use a paint thickness gauge before you start. Most classic cars have 80-120 microns of total paint. If you’re below 60, skip compounding entirely. Only polish. You can’t bring back paint you’ve sanded away.
Step Three: Protection
You’ve corrected the paint. Now protect it. This is where most people fail. They wax it once and forget it. But wax on classic paint lasts maybe 6 weeks. You need something better.For classic cars, ceramic coatings are risky. They bond chemically to the paint. If your paint is old and porous, the coating can trap moisture underneath and cause lifting. Stick with high-quality carnauba wax or a synthetic sealant made for vintage finishes.
Products like Collinite 845 Insulator Wax or P21S 12-Step Paintwork Protection System are ideal. They’re thick, durable, and breathable. Apply two thin coats, spaced 24 hours apart. Let each coat cure fully before driving.
After application, store the car indoors. If you must keep it outside, use a breathable cotton cover. Never use plastic. It traps humidity and causes condensation under the wax, which leads to water spots and dulling.
What Not to Do
There are three mistakes almost everyone makes with classic paint:- Using automatic car washes. The brushes are too abrasive. Even the softest ones can scratch lacquer.
- Washing with dish soap. Dawn or Fairy Liquid strips wax and eats into old paint. Use pH-neutral car wash soap like Chemical Guys Mr. Pink.
- Polishing in direct sunlight. The heat makes the product dry too fast. You end up with streaks and haze. Work in the shade or early morning.
Also, don’t try to fix deep scratches with a magic pen or rubbing compound alone. If you can catch your fingernail in the scratch, it’s too deep. That needs professional wet sanding. And that’s not a DIY job unless you’ve done it before on a donor car.
Real-World Example: A 1969 Chevrolet Impala
I worked on a 1969 Impala last spring. The owner thought it just needed wax. When I wiped the hood with a clay bar, I pulled out three different types of contamination: tree sap, industrial fallout, and old polish residue. The paint was 60% oxidized. I used M105 with a foam pad, then M205 with a microfiber pad. After two coats of Collinite 845, the car looked like it had just come off the assembly line in Flint. The owner cried. Not because it cost a lot-it didn’t-but because he hadn’t seen it look this good since he was a kid.How Often Should You Do This?
If you drive your classic car once a month and store it properly, you only need to do a full correction every 3-5 years. Maintenance is simple: wash it every two weeks with pH-neutral soap, clay it once a year, and reapply wax every 4-6 months.Keep a log. Note the date of each correction, the products used, and the condition of the paint. You’ll thank yourself later when you’re trying to sell it or pass it on.
Final Thoughts
Paint correction isn’t about making your car look new. It’s about bringing back its soul. The right process respects the original finish. It doesn’t erase history-it preserves it.Don’t rush it. Don’t cut corners. And don’t let someone with a $20 kit from Amazon touch your car. Classic paint is fragile. Treat it like a museum piece-because in a way, it is.
Can I do paint correction on a car with original paint?
Yes, but only if the paint is intact and not too thin. Original paint on classics is often 60-100 microns thick. Use a paint thickness gauge before starting. If it’s under 60 microns, skip compounding and only polish with a very fine product. Never remove more than 5-10 microns total in one session.
Is ceramic coating safe for classic cars?
Generally, no. Ceramic coatings bond chemically to the paint surface. Classic lacquer and enamel are porous and can trap moisture underneath. Over time, this causes bubbling, lifting, or delamination. Stick with wax or synthetic sealants designed for vintage finishes. They’re breathable and reversible.
How do I know if my paint is lacquer or enamel?
Lacquer was common before 1970. It dries fast, is softer, and dissolves easily with alcohol. Enamel came later and is harder. Test a hidden area with a cotton swab dipped in isopropyl alcohol. If the paint softens or smears, it’s lacquer. If it resists, it’s enamel. Never test on visible areas.
Do I need a dual-action polisher, or can I do it by hand?
You can do it by hand, but it’s extremely labor-intensive and less effective. Hand polishing won’t remove deep scratches or oxidation evenly. A dual-action polisher gives consistent pressure and speed. For classic cars, where paint is thin, that control matters. If you’re on a budget, rent one for a day-it’s cheaper than ruining a panel.
What’s the difference between compounding and polishing?
Compounding removes material to fix defects like scratches and oxidation. It’s abrasive and rough. Polishing smooths the surface after compounding to create shine. It’s finer and gentler. Think of compounding as sanding and polishing as buffing. You need both to get a perfect finish.
If you’re unsure where to start, take a small panel-like a rear quarter panel-and practice first. Learn how the paint reacts. Then move to the hood or fenders. Patience here saves your car.
Comments
Rohit Sen
Honestly? If you're still using wax on a classic, you're doing it wrong. But hey, whatever makes you feel like a gentleman in a 1969 Impala.
November 16, 2025 at 19:54
Vimal Kumar
I started with a quarter panel like the post said and it changed everything. Took me three hours but I didn't ruin anything. You don't need to be a pro, just patient.
November 17, 2025 at 11:01
Amit Umarani
The post says 'you’ll know you’re doing it right when the paint starts to look cloudy.' That's not correct. It should be 'you’ll know you’re doing it right when the paint starts to look *hazy*.' Cloudy implies contamination, not correct compounding.
November 19, 2025 at 04:48
Noel Dhiraj
Just did my 72 Chevelle last weekend. M105 then M205. Two coats of Collinite. Took a week of weekends but now it gleams like it just left GM. Don't overthink it. Just start.
November 19, 2025 at 10:15
vidhi patel
This entire article is riddled with grammatical inconsistencies and improper use of the Oxford comma. Furthermore, the suggestion to use a dual-action polisher without specifying RPM ranges is dangerously irresponsible. Classic paint requires precision, not casual experimentation.
November 19, 2025 at 11:44
Priti Yadav
Wait. You're telling me ceramic coatings are bad? What if they're applied by a certified technician in a climate-controlled booth? This whole post feels like Big Wax is paying you to scare people away from modern tech.
November 21, 2025 at 10:20
Ajit Kumar
It is imperative to note that the term 'compounding' is frequently misused in the automotive detailing community. Technically, compounding refers to the removal of material through abrasion, whereas polishing is the refinement of that surface. The conflation of these terms, as seen in this post, undermines the very foundation of proper paint correction methodology. Furthermore, the recommendation to use a foam pad over wool is not universally applicable; wool, when used with proper technique and adequate lubrication, remains superior for deep defect removal on lacquer finishes. Additionally, the assertion that dish soap strips wax is accurate, yet the suggestion to use 'Mr. Pink' as a panacea is misleading-its pH neutrality does not guarantee compatibility with all vintage paint systems, particularly those with compromised clearcoat equivalents. One must always perform a spot test on an inconspicuous area prior to full application.
November 23, 2025 at 09:09
Diwakar Pandey
I’ve got a '68 Mustang with original paint. 78 microns on the hood. I skipped compounding. Just M205 on a microfiber pad. Took two evenings. Now it looks like it’s got depth. Not shiny like new, but real. Like it remembers being new.
November 25, 2025 at 00:33
Geet Ramchandani
Let me guess-this whole guide was written by someone who bought a $300 polisher after watching three YouTube videos. You think wiping a panel with a towel after compounding means you’re done? You’re not preserving history-you’re sanding away the patina that gives these cars their soul. And don’t even get me started on Collinite. That stuff is just glorified candle wax. Real enthusiasts use pure carnauba from the 1950s, hand-rubbed with a cotton cloth under moonlight.
November 25, 2025 at 07:25
Pooja Kalra
There is a deeper truth here. Paint correction is not about restoring the car. It is about restoring the owner’s memory. The gleam on the hood is not paint-it is the reflection of a childhood summer, of a father’s pride, of time that cannot be reclaimed. To polish is to remember. To wax is to mourn.
November 25, 2025 at 23:21
Sumit SM
I just want to say, the part about not using plastic covers? Absolutely correct. I had a '67 Falcon, and I used a plastic tarp because I was lazy. Three months later, the paint had water spots that looked like the car had been attacked by a swarm of angry bees. I cried. Not because of the cost. Because I broke the silence of the car. It deserved better.
November 26, 2025 at 07:21
Jen Deschambeault
This is the kind of post that reminds me why I love classic cars. Not the money, not the status. Just the quiet act of bringing something back to life. I’m not a mechanic. I’m just a mom who drives her husband’s '71 Charger to the grocery store. But I wash it every two weeks. And I still get that little thrill when the sun hits the hood just right.
November 28, 2025 at 00:24
Kayla Ellsworth
Wow. So you’re telling me the only way to preserve a classic car is to spend $800 on products, rent a polisher, and pray you don’t sand through the paint? Meanwhile, people in Germany just park theirs in a garage and let the patina breathe. Maybe the real problem isn’t the paint-it’s the obsession with perfection.
November 28, 2025 at 05:21
Soham Dhruv
I did this on my 69 mustang last year and man i forgot how much fun it was. took me 3 weekends but now people stop and ask if its a show car. i used the m105 and m205 like you said and collinite. dont forget to wash your pads after each panel or you'll scratch yourself. also dont do it in direct sun. i did one panel in sun and it turned into a mess. lesson learned.
November 29, 2025 at 12:47