Most people think car maintenance means a trip to the garage, expensive bills, and waiting around for hours. But if you know the basics, you can handle most routine tasks right in your driveway. You don’t need a degree in engineering or a full workshop. Just a few tools, some time, and the confidence to get your hands dirty. And the savings? A typical oil change at a shop costs £50-£70. Do it yourself, and you’ll spend under £20. That’s £500 a year just on oil changes alone.
Check Your Oil Level and Change It Regularly
Your engine runs on oil. Without it, metal parts grind together and overheat. Most modern cars need an oil change every 10,000 to 15,000 miles, but check your manual. If you drive in stop-and-go traffic or dusty conditions, do it sooner.
Here’s how to check your oil:
- Turn off the engine and wait 5 minutes for the oil to settle.
- Pull out the dipstick, wipe it clean with a rag.
- Reinsert it fully, then pull it out again.
- Look at the marks on the stick. Oil should be between the minimum and maximum lines.
- If it’s low, add the type of oil your car needs - usually 5W-30 or 5W-40. Don’t mix brands.
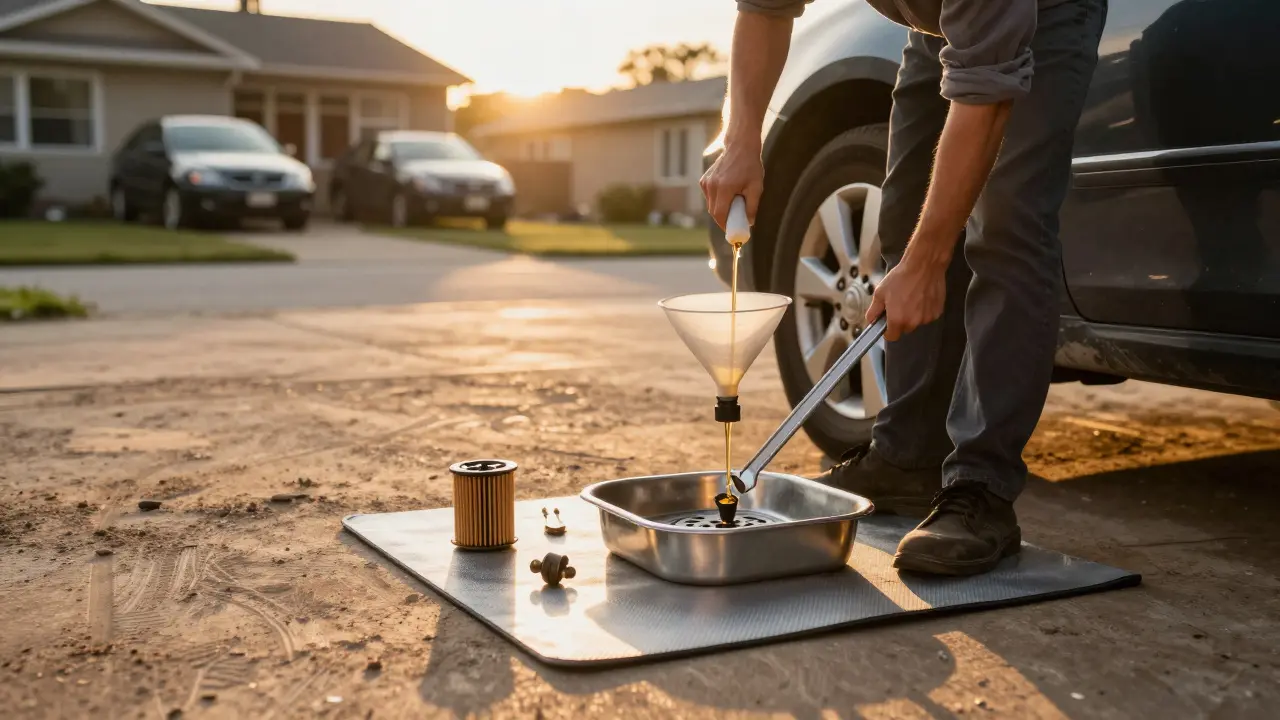
For an oil change, you’ll need: a wrench, a new oil filter, a funnel, a drain pan, and the right oil. Jack up the car safely using jack stands - never rely on a jack alone. Remove the drain plug, let the old oil drip out, replace the filter, refill with new oil, then check the level again. Dispose of used oil at a local garage or recycling centre. Most places take it for free.
Keep Your Tires in Good Shape
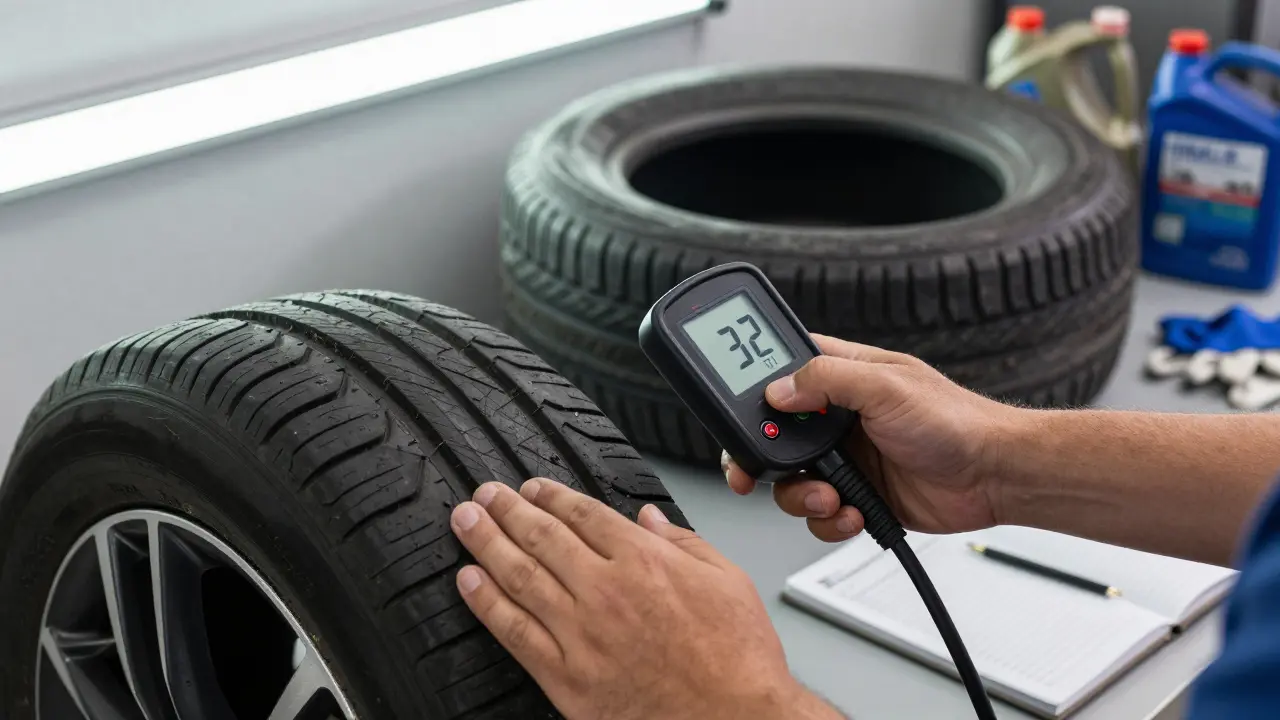
Tires are your only contact with the road. Worn or underinflated tires hurt fuel economy, make braking longer, and can blow out. Check pressure at least once a month, and always before a long trip.
Use a digital tire gauge - cheap ones from £5 online work fine. Look for the recommended PSI on the sticker inside your driver’s door. It’s not on the tire sidewall - that’s the maximum, not the ideal. Most cars need 30-35 PSI. If it’s low, fill it at a petrol station. If it’s overinflated, press the valve stem to let air out.
Look for uneven wear. If the edges are more worn than the middle, you’re underinflated. If the center is worn, you’re overinflated. Cracks, bulges, or nails? Get them checked. Don’t wait until the tread is below 1.6mm - the legal limit. For safety, replace them at 3mm.
Inspect Your Brake Fluid
Brakes rely on hydraulic pressure. If the fluid is dirty or low, your brakes feel spongy or don’t respond as quickly. Check the brake fluid reservoir under the hood. It’s usually a small plastic tank near the firewall, labeled with “brake fluid.”
The fluid should be clear or slightly yellow. If it’s dark brown or black, it’s contaminated and needs replacing. Most manufacturers say replace it every two years, but if you drive in hilly areas or carry heavy loads, do it yearly. Never top up with just any brake fluid - use DOT 4 unless your manual says otherwise. Mixing types can damage your system.
Changing brake fluid yourself isn’t for beginners. It requires bleeding the lines, which needs two people or a vacuum tool. But checking the level and colour? That’s simple. If it’s low, don’t just add more - get it inspected. A drop in fluid often means a leak.
Test Your Battery
A dead battery leaves you stranded, especially in winter. Most car batteries last 3-5 years. If your car struggles to start on cold mornings, or the lights dim when you turn the key, it’s time to check it.
You can buy a simple battery tester for £10-£15. Place the clamps on the terminals - red to positive, black to negative. The display shows if it’s good, weak, or needs replacement. If you don’t have one, turn on the headlights for 5 minutes, then try to start the car. If they dim badly, the battery is weak.
Look for corrosion on the terminals - that white, chalky stuff. Clean it with a mix of baking soda and water, then scrub with an old toothbrush. Dry it off and apply a thin layer of petroleum jelly to prevent future buildup. Always disconnect the negative terminal first when removing the battery.
Replace the Engine Air Filter
A clogged air filter forces your engine to work harder. That means less power and worse fuel economy. Most filters last 15,000-30,000 miles, but if you drive on dusty roads, replace it sooner.
Open the hood and find the airbox - a black plastic box near the engine, usually connected to a large hose. Unclip or unscrew the cover. Pull out the old filter. It should be white or light grey. If it’s dark and covered in dirt, it’s done. Pop in the new one. Make sure the airflow arrow on the filter points toward the engine. Reattach the cover. Done in under 10 minutes.
Check Windshield Washer Fluid and Wipers
It’s easy to forget, but clean visibility matters. Washer fluid runs out fast, especially in winter. Check the reservoir - it’s usually marked with a windshield symbol. Top up with premixed fluid. Don’t use water alone - it freezes and can damage the pump.
Wiper blades wear out. If they streak, chatter, or leave smears, replace them. Most cars use standard sizes - check your manual or measure the old ones. New blades cost £8-£15 each. Lift the arm, press the release tab, slide out the old blade, and snap in the new one. Do this every 6-12 months.
What You Shouldn’t Try at Home
Some jobs are better left to professionals. Don’t touch:
- Timing belts - if they snap, your engine can be destroyed.
- Transmission fluid - modern systems need special tools and diagnostics.
- AC recharge - requires refrigerant handling certification and equipment.
- Electrical system repairs - wiring issues can cause fires or damage ECUs.
If you’re unsure, stop. A £20 mistake can turn into a £2,000 repair.

Tools You Need to Start
You don’t need a full garage. Here’s what you need to cover the basics:
- Socket set with ratchet (8-19mm range)
- Jack and jack stands (never use a jack alone)
- Tire pressure gauge
- Oil filter wrench
- Funnel
- Drain pan
- Latex or nitrile gloves
- Engine oil (check your manual for type)
- Engine air filter (correct size for your model)
- Battery tester
- Wiper blades (matched to your car)
Store these in a plastic toolbox. Keep them clean and dry. A basic set costs under £100 - less than one garage visit.
Why DIY Car Maintenance Makes Sense
It’s not just about saving money. When you do your own maintenance, you learn your car. You notice small changes - a new noise, a slight vibration, a drop in performance. These early warnings can stop bigger problems. You’re not just fixing your car - you’re building a relationship with it.
Plus, you control the quality. You know exactly what oil you used. You checked the tire pressure yourself. You didn’t trust a mechanic who might rush through a job.
Start small. Change your oil once. Replace your air filter. Check your tires. Then do it again next month. You’ll be surprised how easy it becomes. And by next winter, you’ll be the one helping friends with their cars - not the one calling for a tow truck.
How often should I change my car’s oil?
Most modern cars need an oil change every 10,000 to 15,000 miles. But if you drive in heavy traffic, dusty conditions, or extreme temperatures, do it every 7,500 miles. Always check your owner’s manual - some newer engines use synthetic oil that lasts longer. If the oil looks black and gritty on the dipstick, it’s time to change it, even if you haven’t hit the mileage.
Can I use any type of engine oil?
No. Your car needs a specific viscosity, like 5W-30 or 0W-20. Using the wrong type can damage the engine or reduce fuel efficiency. The correct oil is listed in your owner’s manual or on the oil cap. Stick to reputable brands - Castrol, Shell, Mobil 1 - and avoid cheap, unknown brands. Mixing synthetic and conventional oil is okay in a pinch, but not ideal for long-term use.
Why is my tire pressure light on even after inflating the tires?
The tire pressure monitoring system (TPMS) might need resetting. After inflating all tires to the correct PSI, drive at 20 mph for 10-15 minutes. Some cars require you to press a reset button, usually under the steering wheel or in the infotainment menu. If the light stays on, one of your sensors may be faulty. A garage can diagnose it with a scan tool - it’s usually not expensive to fix.
Is it safe to change brake fluid myself?
You can check the level and condition of brake fluid, but changing it properly requires bleeding the brake lines. This needs special tools and two people - one to pump the pedal, one to open the bleed valves. If done wrong, air gets trapped in the system, making brakes spongy or useless. Unless you’ve done it before or have help, it’s safer to leave this to a professional.
How do I know if my car battery is dying?
Signs include slow cranking when starting, dim headlights, or the battery warning light on the dashboard. If your car starts fine in summer but struggles in winter, the battery is likely weak. Most batteries last 3-5 years. Test it with a cheap multimeter - a healthy battery reads 12.4-12.7 volts when off. Below 12.2 volts means it’s failing. Replace it before you get stranded.
Next Steps: Build Your Confidence
Start with one task this weekend - maybe checking your oil or topping up washer fluid. Write down what you did, what tools you used, and how long it took. Next time, add another. Soon, you’ll be changing your own air filter and tire pressure without thinking twice.
Keep a small notebook in your glovebox. Note dates for oil changes, tire rotations, and fluid checks. You’ll know exactly when to do the next one. No more guessing. No more surprises.
DIY car maintenance isn’t about being a mechanic. It’s about being in control. Your car doesn’t need fancy tools - it needs attention. And that’s something you already have.
Comments
Gabby Love
Just did my first oil change last weekend. Took me 45 minutes, spilled a little, but got it done. Saved $60 and felt like a wizard. The dipstick trick is gold - I didn’t realize how dark the old oil was until I wiped it clean.
Also, never knew you shouldn’t mix brands. Learned something today.
Thanks for the clear guide.
December 26, 2025 at 06:29
Xavier Lévesque
Yeah right. Next you’ll tell me I can rewire my alternator with duct tape and a butter knife.
DIY is great until your engine turns into a paperweight and you’re paying double to fix what you ‘saved’ on.
Still, I respect the hustle. Just don’t blame me when your ‘5W-30’ is actually motor oil from the hardware store.
December 27, 2025 at 00:13
Thabo mangena
It is truly commendable to embrace such practical self-reliance in an age of increasing dependence on external services. The discipline required to perform routine automotive maintenance reflects a deeper commitment to personal responsibility and environmental stewardship, particularly in the responsible disposal of used oil.
May this practice inspire others to cultivate similar habits of care, not only for machines, but for the communities we inhabit.
December 28, 2025 at 02:45
Karl Fisher
Oh my god, you mean I don’t need to pay $200 for an oil change? I’ve been getting scammed my entire life. I just thought my car was a magic dragon that needed gold coins to run.
Also, I’m now convinced that every mechanic I’ve ever met is secretly a vampire who feeds on middle-class anxiety.
Also also - I just bought a socket set. My life is changed. 🥹
December 29, 2025 at 14:47
Buddy Faith
you think its that easy
the oil filter is always stuck
the jack slips
and the new filter leaks because you didnt tighten it enough
then you realize you used the wrong oil
and your car starts knocking
and now you owe 3k
and the mechanic laughs at you
you think you saved money
you didnt
you lost
December 31, 2025 at 07:07
Scott Perlman
do one thing at a time
oil change first
then check tires
then air filter
you dont need to do it all
just start
youll be surprised how good it feels
no stress
just you and your car
and you win
December 31, 2025 at 08:44
Ian Maggs
There is, of course, an existential dimension to DIY car maintenance: in the ritual of checking oil, one confronts the impermanence of mechanical systems - and, by extension, the fragility of human control over the material world.
Each dipstick withdrawal becomes a meditation on entropy - the inevitable drift toward disarray.
And yet - in the quiet of the driveway, with the scent of warm oil and the hum of distant traffic - one finds not just economy, but a peculiar, almost sacred, communion with the machine.
Perhaps the car is not merely a tool - but a mirror.
And we, in our grease-stained gloves, are merely students - not masters.
But still - we try.
And in trying, we become more than consumers.
We become participants.
And perhaps - that is the truest savings of all.
January 1, 2026 at 14:51
Michael Gradwell
you guys are so naive
you think you're saving money
but you're just giving mechanics an excuse to charge you more later
because now you're 'the guy who did his own oil change'
so when you bring it in for a real problem
they'll say 'oh you did the oil change? well that explains why the head gasket blew'
and you pay double
and they laugh
trust me
i've seen it happen
like 12 times
you're not saving
you're just getting scammed slower
January 3, 2026 at 09:03
Flannery Smail
my buddy did all this and now his engine is a paperweight
he says it was the oil filter
but i think he used water instead of coolant
or maybe he mixed synthetic with regular
or maybe he just didn’t know the difference between brake fluid and power steering fluid
point is
you think you’re smart
but you’re just one mistake away from a tow truck
and a new car
and a divorce
so maybe just… pay the $60
January 3, 2026 at 19:49
Emmanuel Sadi
you think this is advice
it’s a trap
every single thing you just said is a lie
your oil change interval is set by the dealer to sell more parts
your tire pressure numbers? fake
your brake fluid? they’re hiding leaks
and your battery tester? calibrated wrong
you’re not saving money
you’re feeding the system
they want you to think you’re independent
so you don’t ask questions
so you don’t organize
so you keep buying new cars every 5 years
wake up
you’re being played
January 4, 2026 at 00:58
Nicholas Carpenter
Really appreciate this. I started with just checking my tire pressure - didn’t even know what PSI meant. Now I do oil changes and air filters. It’s not about being a mechanic. It’s about not being helpless.
And honestly? It’s kind of peaceful. Like gardening, but with more grease.
Thanks for keeping it real.
January 5, 2026 at 19:19
Ryan Toporowski
YOU GOT THIS 💪🔧
first oil change? celebrate with a soda 🥤
first time you changed your own air filter? you’re a LEGEND 🏆
you don’t need to be perfect - you just need to start.
and if you mess up? so what? you learned.
every pro was a beginner once.
and guess what? you’re already ahead of 90% of people who still think ‘maintenance’ means ‘taking it to someone else’
keep going - your future self will high-five you 😎
January 5, 2026 at 21:45
Samuel Bennett
you said 'don't mix brands' but you didn't mention that all oil is the same base stock anyway
and 'use 5w-30' - except 70% of cars can use 0w-20 now
and you didn't say anything about synthetic vs conventional
and you said 'dispose at a garage' - but most garages charge $5 to recycle it
and you didn't warn about the torque specs on the drain plug
and you didn't mention that jack stands can fail if not rated for your vehicle
and you didn't say that brake fluid absorbs moisture in 2 years - so checking color is useless
and you didn't say that battery testers are inaccurate if the battery is cold
and you didn't say that wiper blades are often sold in wrong sizes
and you didn't say that most 'air filters' are just cardboard with a plastic frame
and you didn't say that your car manual is written by lawyers - not engineers
so your whole guide is garbage
and you're teaching people to kill their engines
January 6, 2026 at 20:39
Rob D
you think this is DIY? this is what they let you do so you don’t ask questions about the chinese-made parts and the oil that’s half-synthetic and the tires that expire after 6 years even if they look fine
we used to fix cars with wrenches and guts
now you need a $200 scanner just to reset a light
and you think you’re saving money?
you’re just paying for the illusion of control
real Americans used to build engines from scratch
now you’re changing filters like a damn IKEA assembly worker
get real
you’re not fixing your car
you’re just keeping the machine running so it can keep eating your paycheck
January 7, 2026 at 07:42